Changing Priority from IPv6 to IPv4 in Ubuntu and CentOS: A Complete Guide
Reference:
In modern networks, IPv6 is increasingly used, but there are cases when it is necessary to give preference to IPv4. This article discusses ways to change the priority from IPv6 to IPv4 for various versions of Ubuntu (20.04 and 22.04) and CentOS 7. We will look at two methods: configuring the gai.conf file and using sysctl parameters.
Method 1: Changing Priority via gai.conf
The gai.conf (getaddrinfo configuration) file is used to set address preferences when resolving names. Configuring this file will allow the system to prefer IPv4 addresses over IPv6.
Ubuntu 20.04 and 22.04
Step 1: Opening and Editing **gai.conf**
- Open the terminal.
- Edit the
/etc/gai.conffile with superuser rights:

Find the line containing #precedence **::ffff:0:0/96 10**. If it is commented out (starts with #), remove the # symbol and change the priority weight to 100 to activate it and increase the priority of IPv4:

Step 2: Saving Changes and Restarting Network Services
- Save the file and close the text editor (in nano: press
Ctrl+X, thenYandEnter). - To apply the changes, restart the network services or reboot the system:

Automatic Line Change via Console Command
To automatically change the line, use the following command:
This command will remove the # symbol and change the priority weight to 100 so that the system prefers IPv4 addresses.
CentOS 7
Step 1: Opening and Editing **gai.conf**
- Open the terminal.
- Edit the
/etc/gai.conffile with superuser rights:
Find the line containing **#precedence ::ffff:0:0/96 10**. If it is commented out (starts with #), remove the # symbol and change the priority weight to 100 to activate it and increase the priority of IPv4:
Step 2: Saving Changes and Restarting Network Services
- Save the file and close the text editor.
- Restart the network services:
Automatic Line Change via Console Command
To automatically change the line, use the following command:
This command will remove the # symbol and change the priority weight to 100 so that the system prefers IPv4 addresses.
Method 2: Using sysctl to Configure IPv4 Priority
Using sysctl parameters allows you to manage kernel settings, which is useful for completely disabling IPv6 or changing its behavior at the kernel level.
Ubuntu 20.04 and 22.04
Step 1: Disabling IPv6 via **sysctl**
- Open the terminal.
- Edit the
/etc/sysctl.conffile with superuser rights:
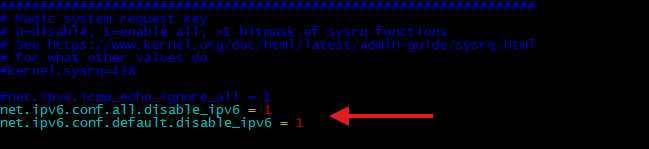
Add the following lines to the end of the file to disable IPv6:
Step 2: Applying Changes
- Save the file and close the text editor.
- Apply the changes using the command:

Restart the network services:
Restarting **systemd-networkd**:
Restarting **NetworkManager**:
CentOS 7
Step 1: Disabling IPv6 via **sysctl**
- Open the terminal.
- Edit the
/etc/sysctl.conffile with superuser rights:
Add the following lines to the end of the file to disable IPv6:
Step 2: Applying Changes
- Save the file and close the text editor.
- Apply the changes using the command:
Restart the network services:
Restarting **network**:
Restarting **NetworkManager**:
Comparison of Methods
Using **gai.conf**
Advantages:
- Does not require complete disabling of IPv6, which can be useful in networks where IPv6 is necessary.
- Easy to configure and minimal changes to the system.
Disadvantages:
- Changes only affect the order of name resolution, not the entire network protocol stack.
Using **sysctl**
Advantages:
- Complete disabling of IPv6 can simplify network troubleshooting and eliminate conflicts.
Disadvantages:
- Complete disabling of IPv6 can cause problems in networks that use only IPv6.
- Requires restarting network services or the system to apply changes.
Conclusion
Changing the priority from IPv6 to IPv4 in Ubuntu and CentOS can be achieved in several ways. Using the gai.conf file allows you to change address priorities when resolving names, while configuring through sysctl can completely disable IPv6, forcing the system to use only IPv4. Both methods have their advantages and disadvantages, and the choice depends on your specific requirements and network conditions. We hope this guide helps you configure your system.